Historic Bathroom Renovation in Grant Park Atlanta: Before & After

Grant Park Primary Bathroom Renovation: Creating Space and Discovering Hidden Potential
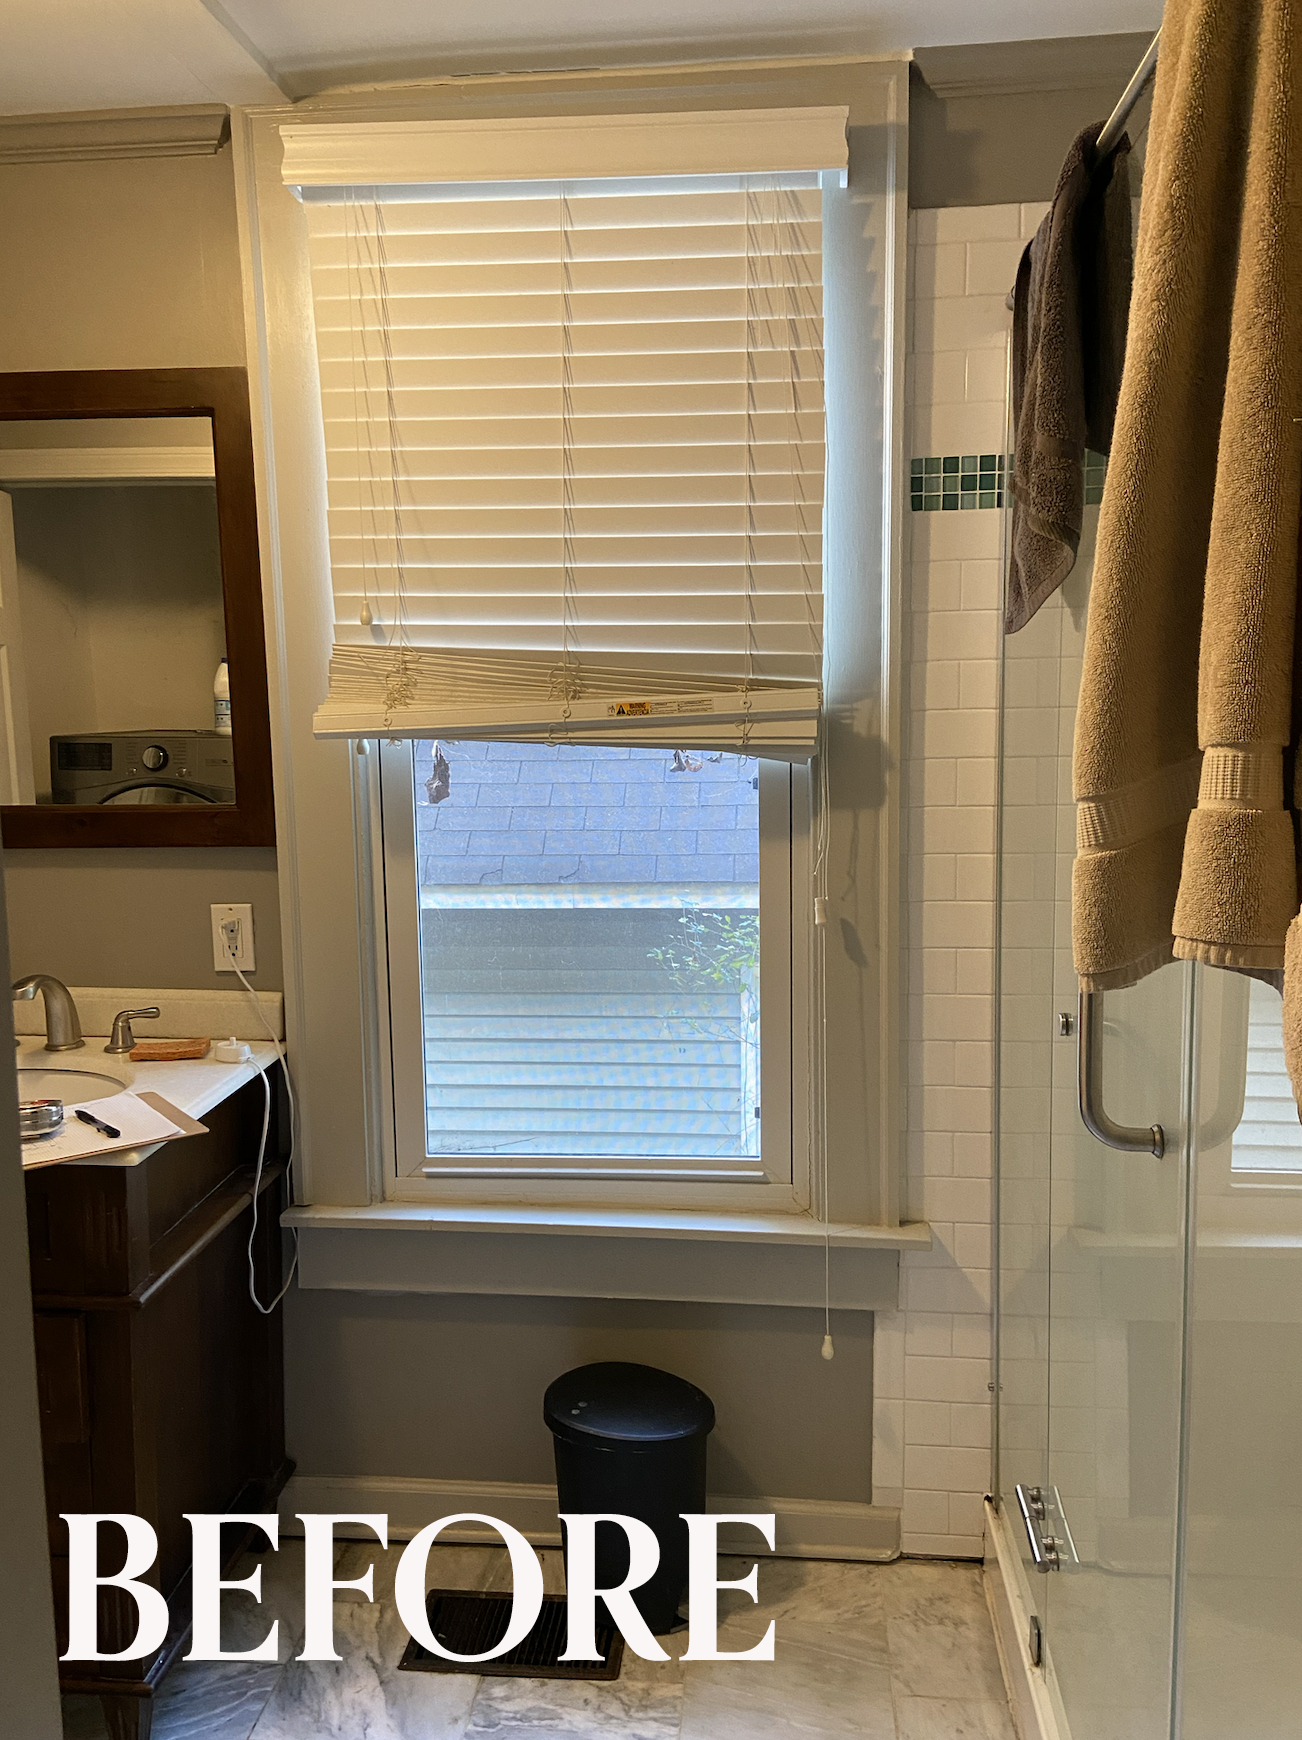
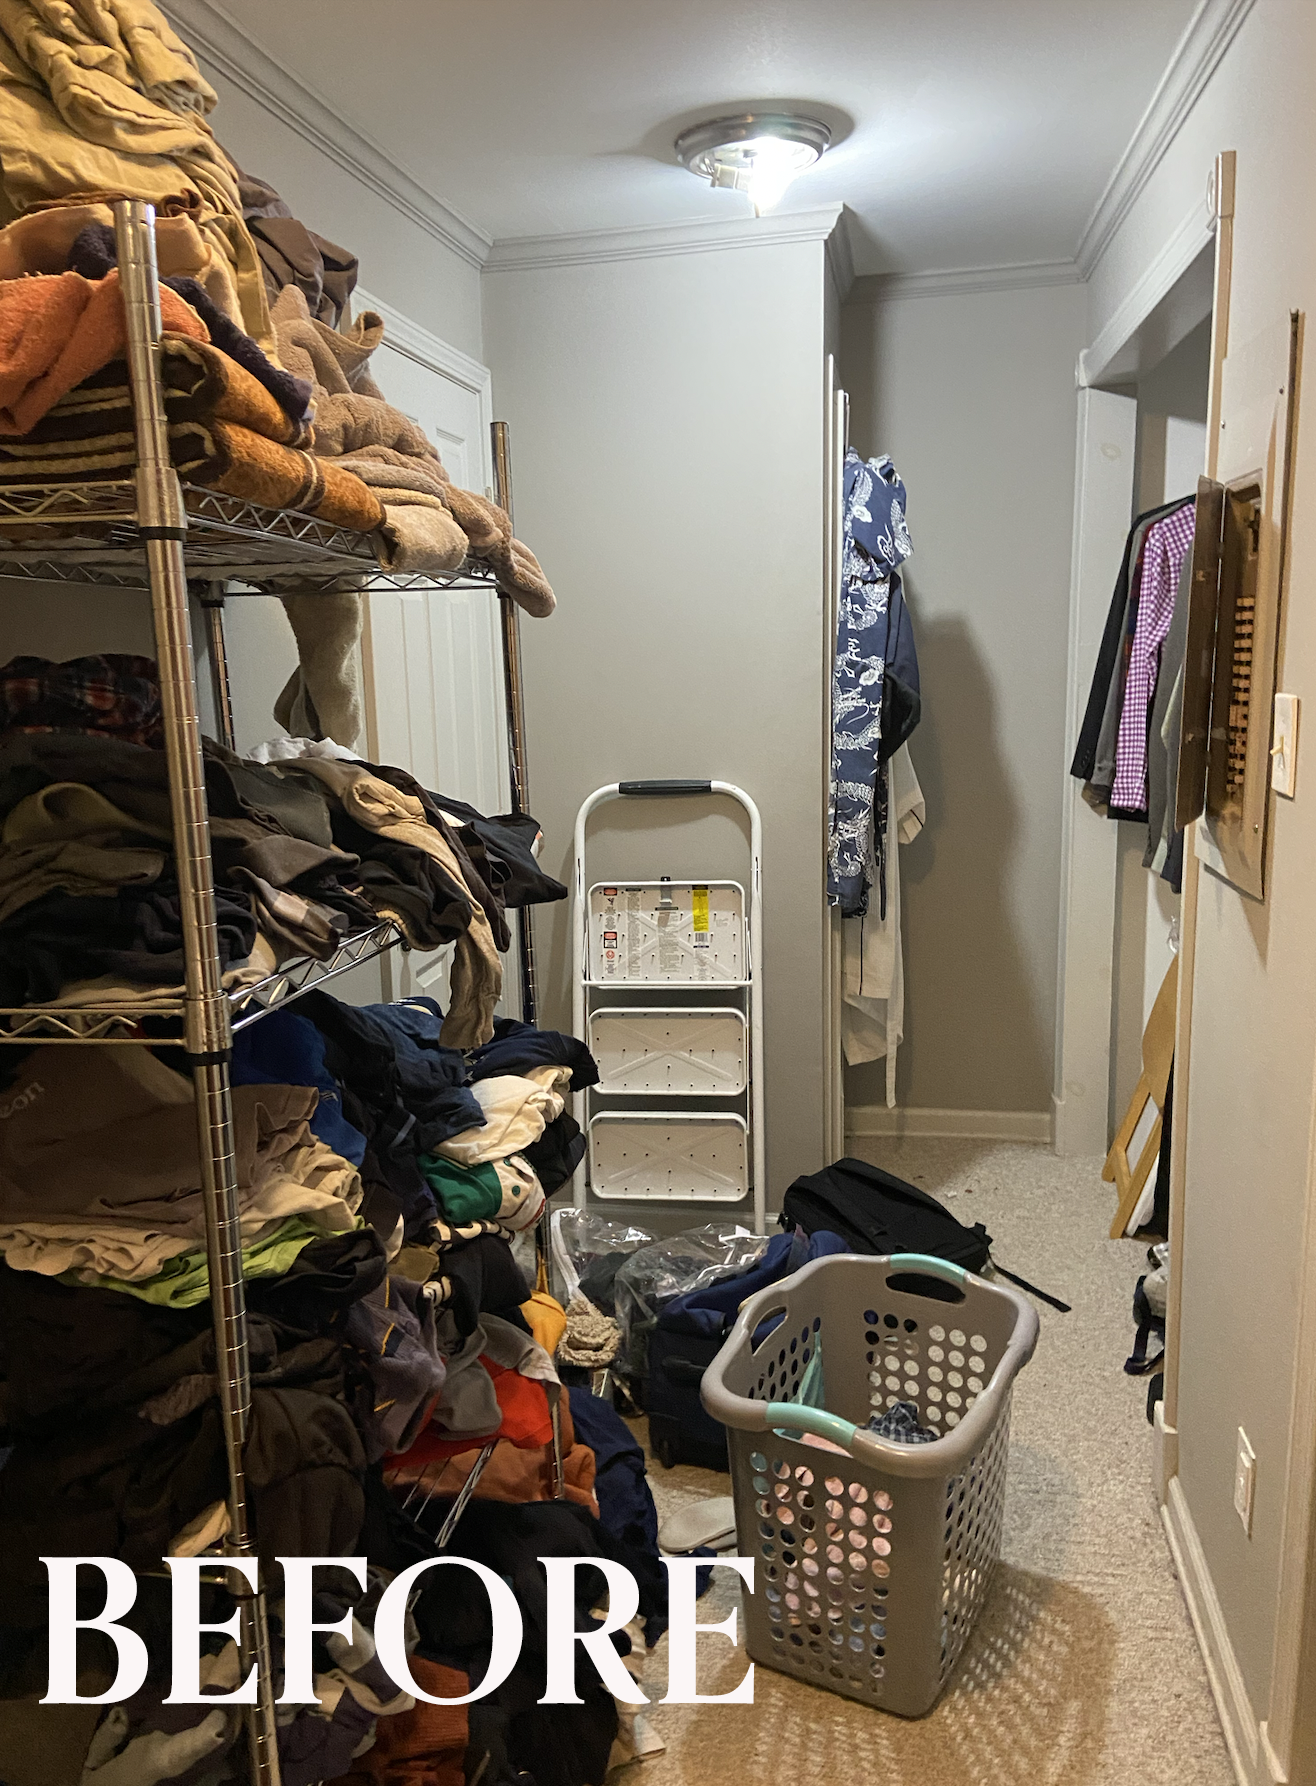
This primary bathroom in Atlanta’s Grant Park neighborhood was in serious need of a refresh. The layout felt cramped, with two entry doors—one leading into the bathroom and another connecting to the closet beside the toilet—taking up valuable square footage. On top of that, a set of bifold doors concealing the washer and dryer further restricted the space and functionality.
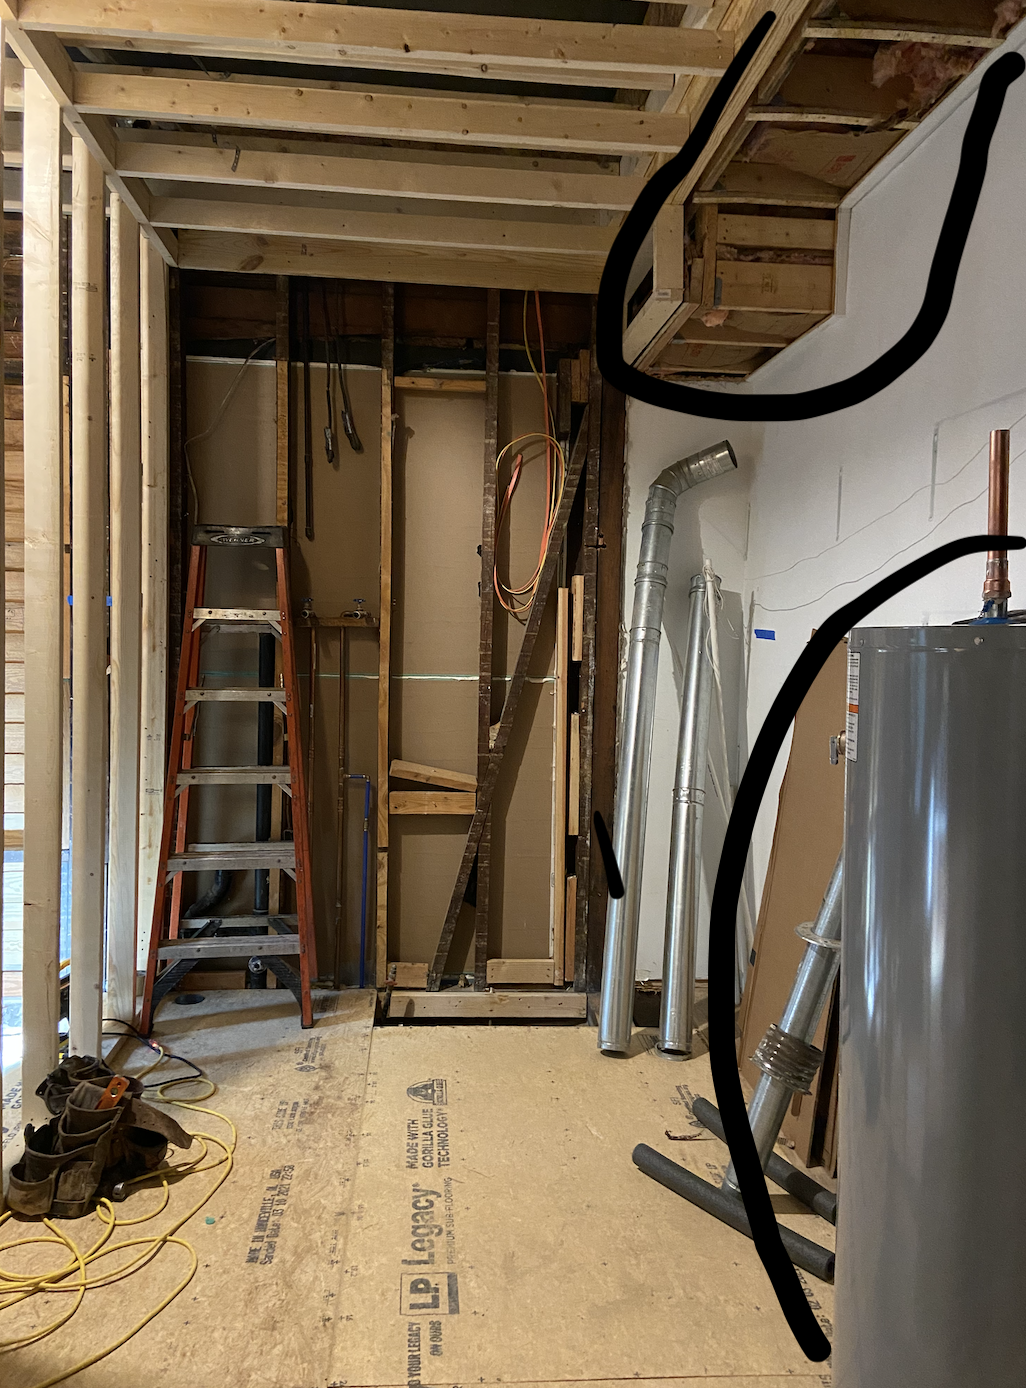
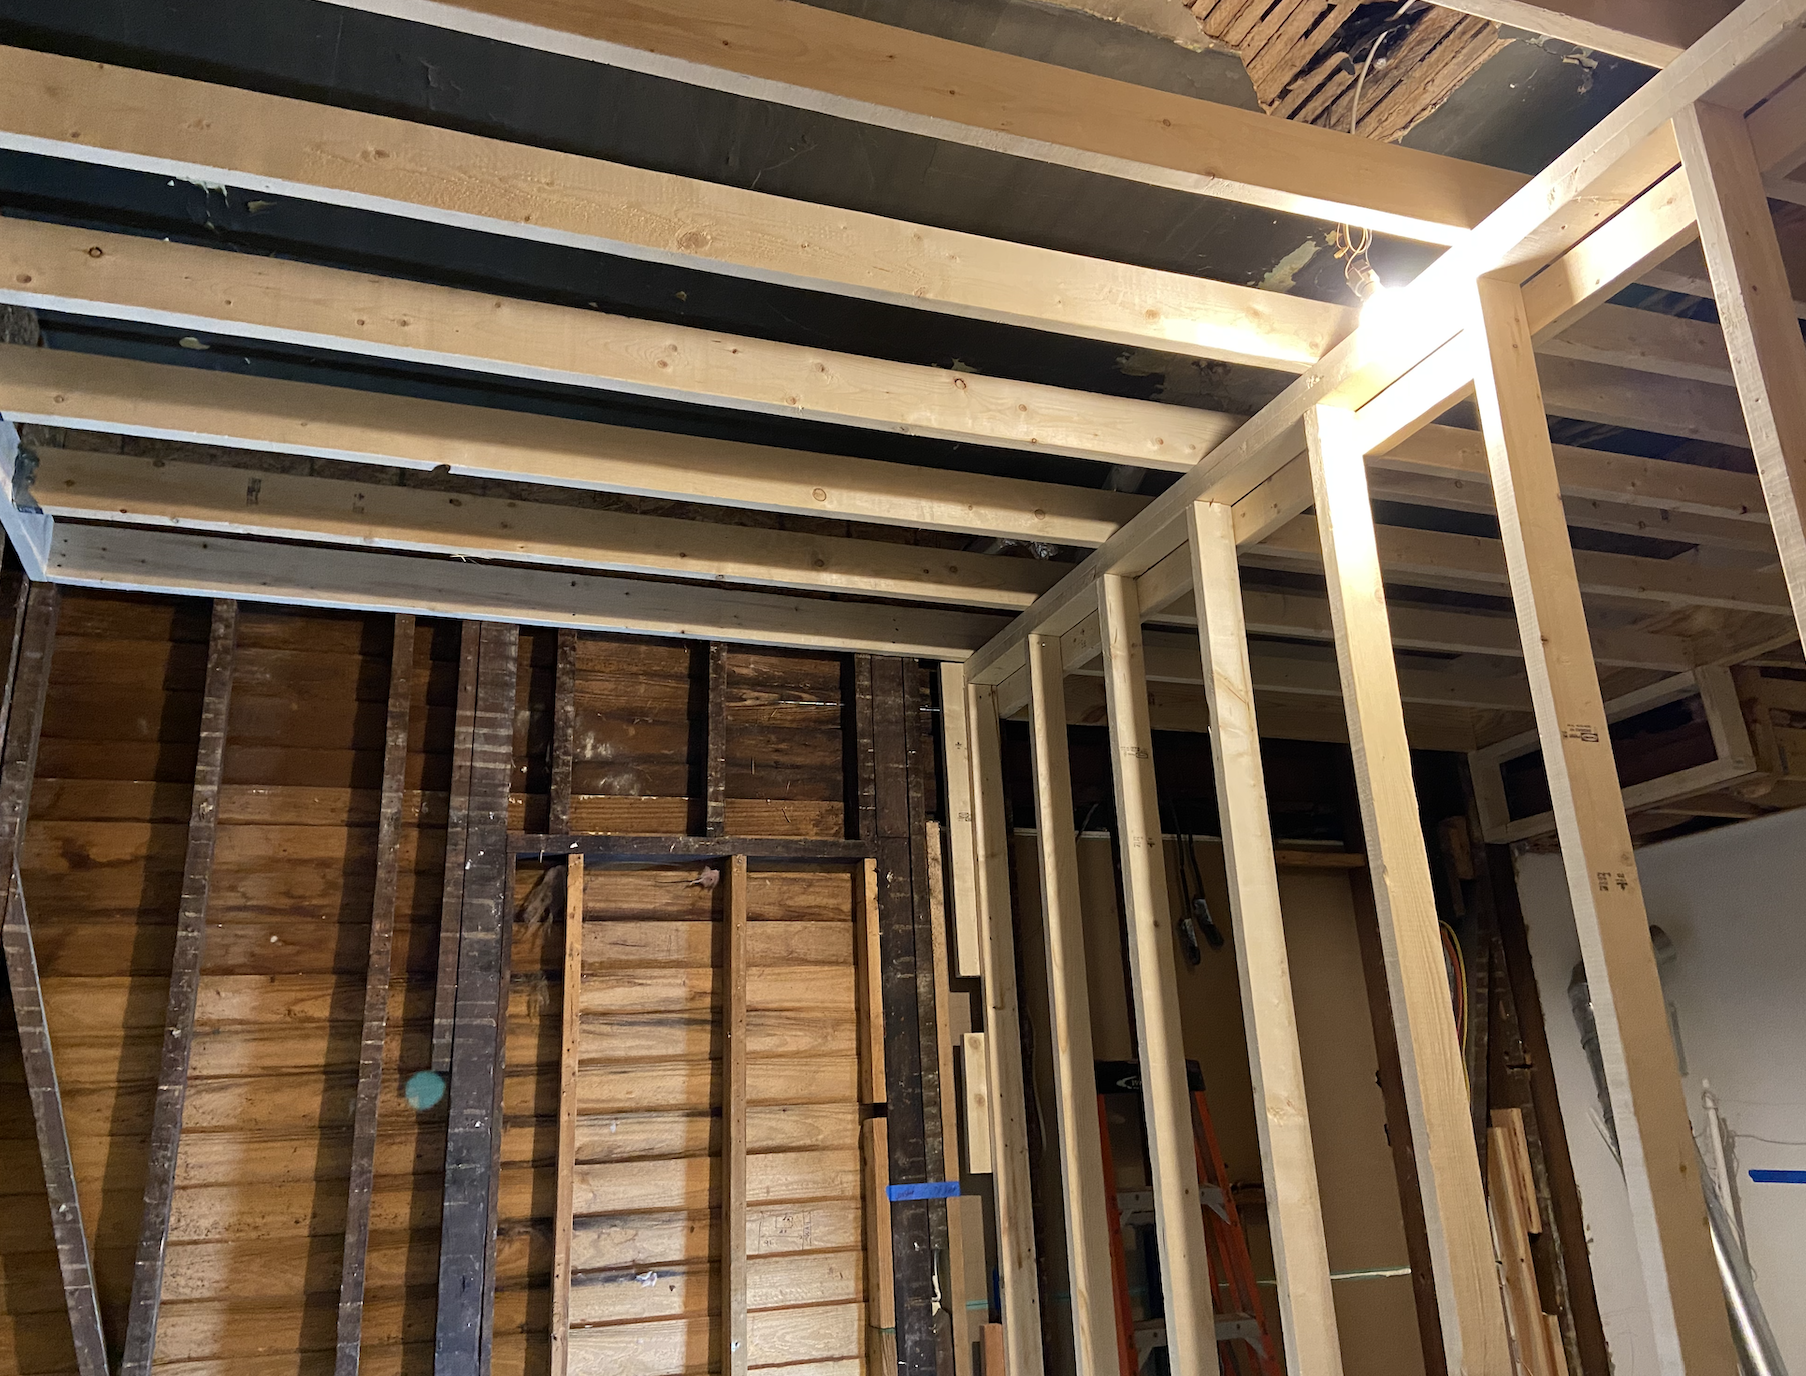
As with many older home renovations, you never quite know what you’ll find once you start demoing down to the studs. In this case, we were thrilled to uncover higher ceilings, which instantly added volume and light to the space. We also discovered some rot in the framing, which we addressed by rebuilding those sections to ensure the bathroom was structurally sound and ready for its transformation.

Addressing Functionality and Flow in This Grant Park Bathroom Renovation
The original bathroom in this Grant Park home was clearly showing signs of wear. The plastic blinds were broken (as they often are over time), the vanity doors were damaged, there was nowhere to hang towels, and overall, storage was severely lacking.
As someone who values clean counters and intentional organization, clutter—especially mismatched plastic bottles—just doesn’t cut it. I prefer a space where daily-use items are thoughtfully arranged and visually calm (though my family may say I’m particular about it!).
My initial renovation concept involved reducing the size of the adjacent closet to create room for both a shower and a bathtub, while keeping the vanity and washer/dryer in their original locations to stay within budget—since relocating plumbing can quickly increase renovation costs.
However, as we explored various layout options, it became clear that keeping the washer and dryer in the main bathroom wasn’t ideal. While it currently serves a single homeowner, any future family occupants would face a serious privacy issue, with access to laundry requiring a walk through the primary bedroom and bathroom.
In Option One, I relocated washer and dryer access to the closet side, which not only solved the privacy concern but also allowed for the addition of a toilet privacy wall, improving both function and layout flow.

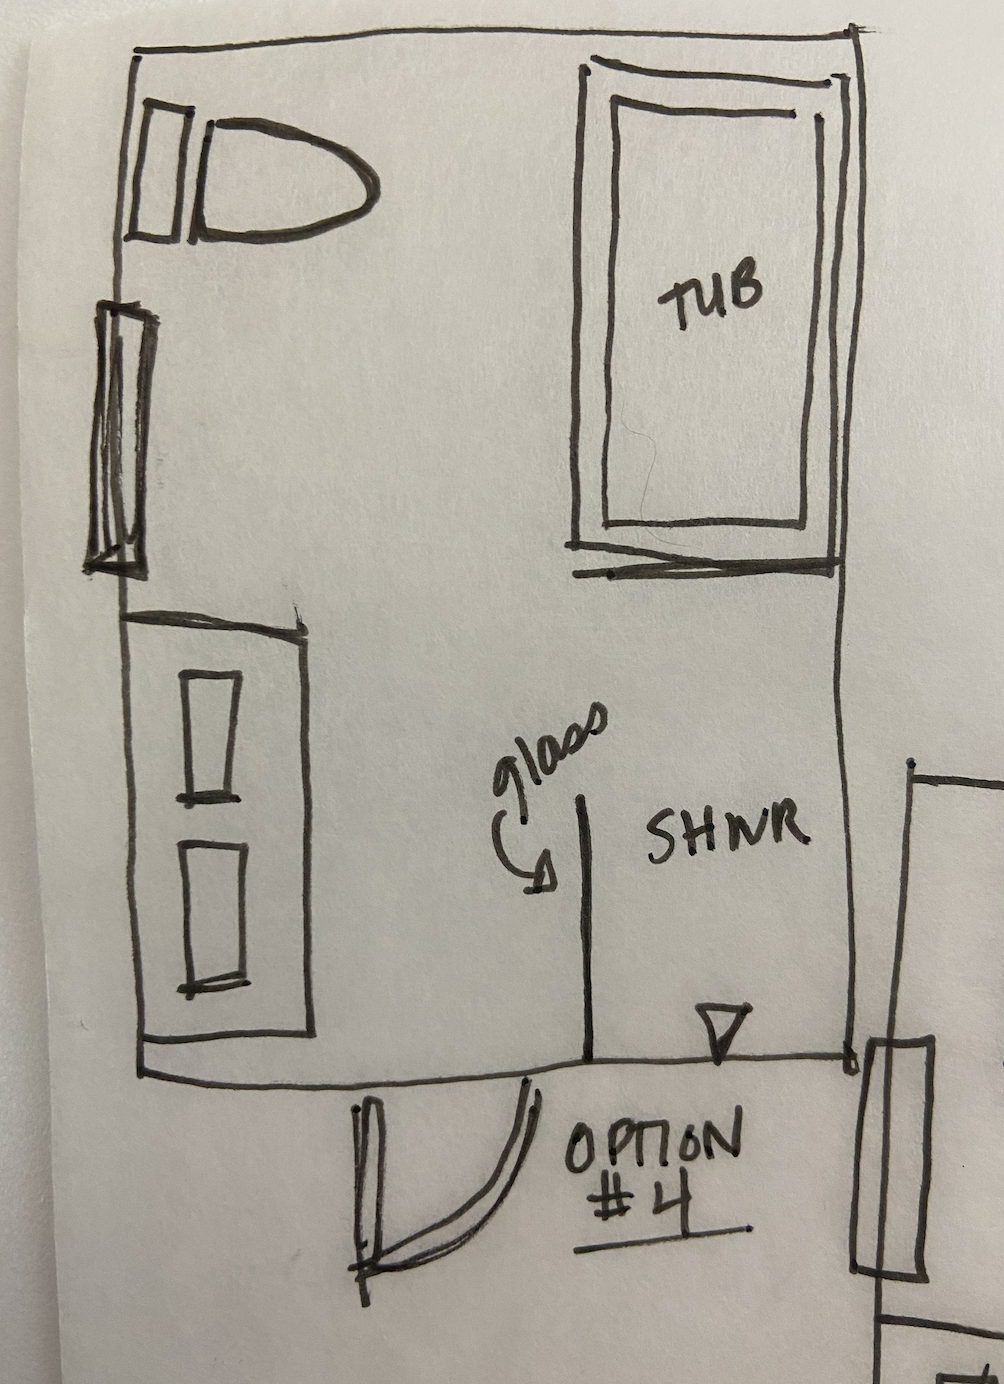
In option two, I stacked the washer and dryer in the far back corner of the closet and added a water closet.

The client had two top priorities for this Grant Park bathroom renovation: adding a bathtub for relaxation and incorporating a window on the back wall to bring in more natural light. To accommodate both, we explored multiple layout options, focusing on how to best use the space while enhancing both form and function.
We considered making the entire back half of the bathroom a wet room, or alternatively, placing the wet zone on the right side of the space. By sketching out these ideas early in the process, we were able to visualize different configurations and evaluate which layout would offer the most efficient flow, natural light distribution, and long-term usability.
This collaborative design process allowed us to prioritize the client's lifestyle needs while maintaining the clean, cohesive aesthetic we were working toward.
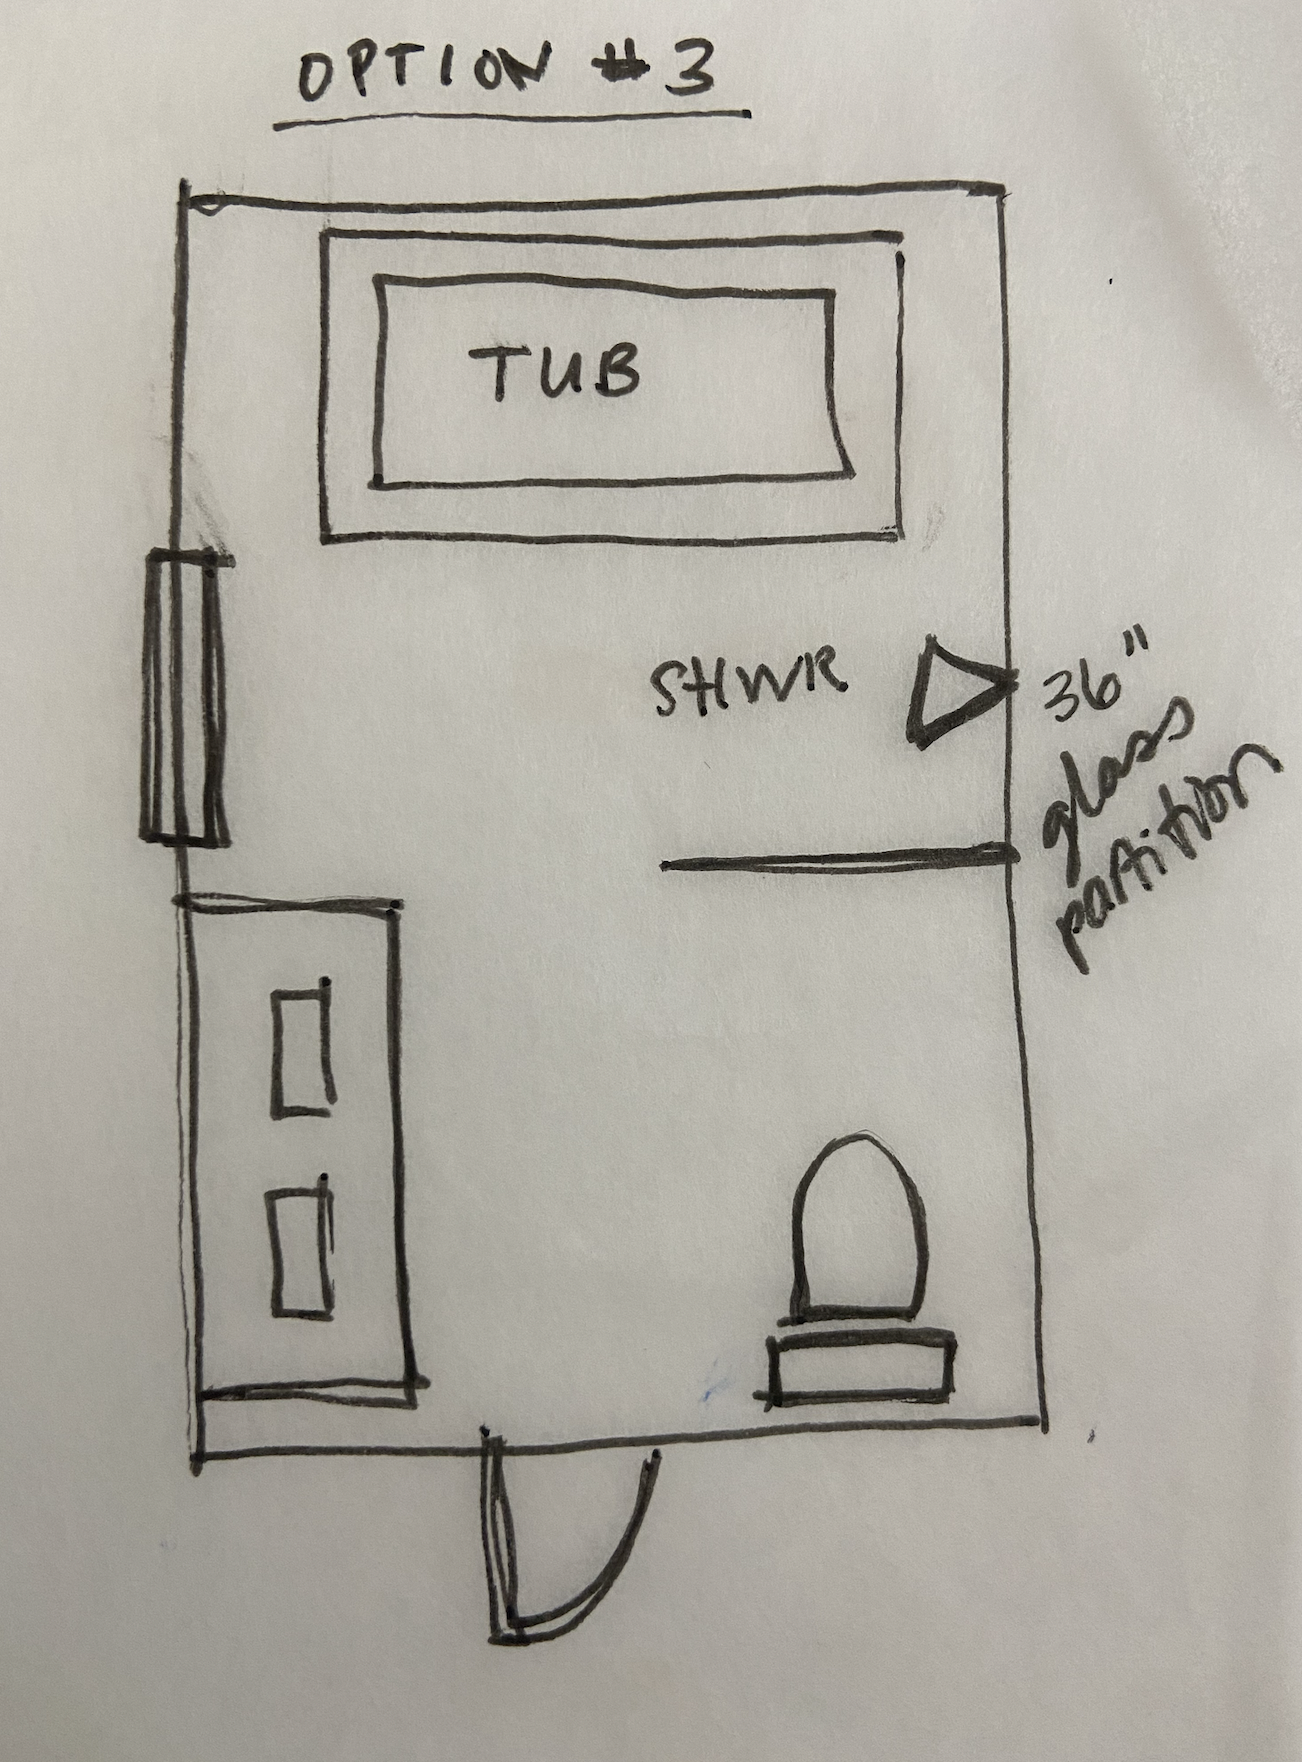
After exploring multiple bathroom layout options, we landed on a plan that balanced both aesthetics and functionality. We centered the bathtub along the back wall, making it a striking focal point as you enter the space. Across from the vanity, we installed a glassed-in shower, which helps maintain an open, airy layout while clearly defining the wet zone.
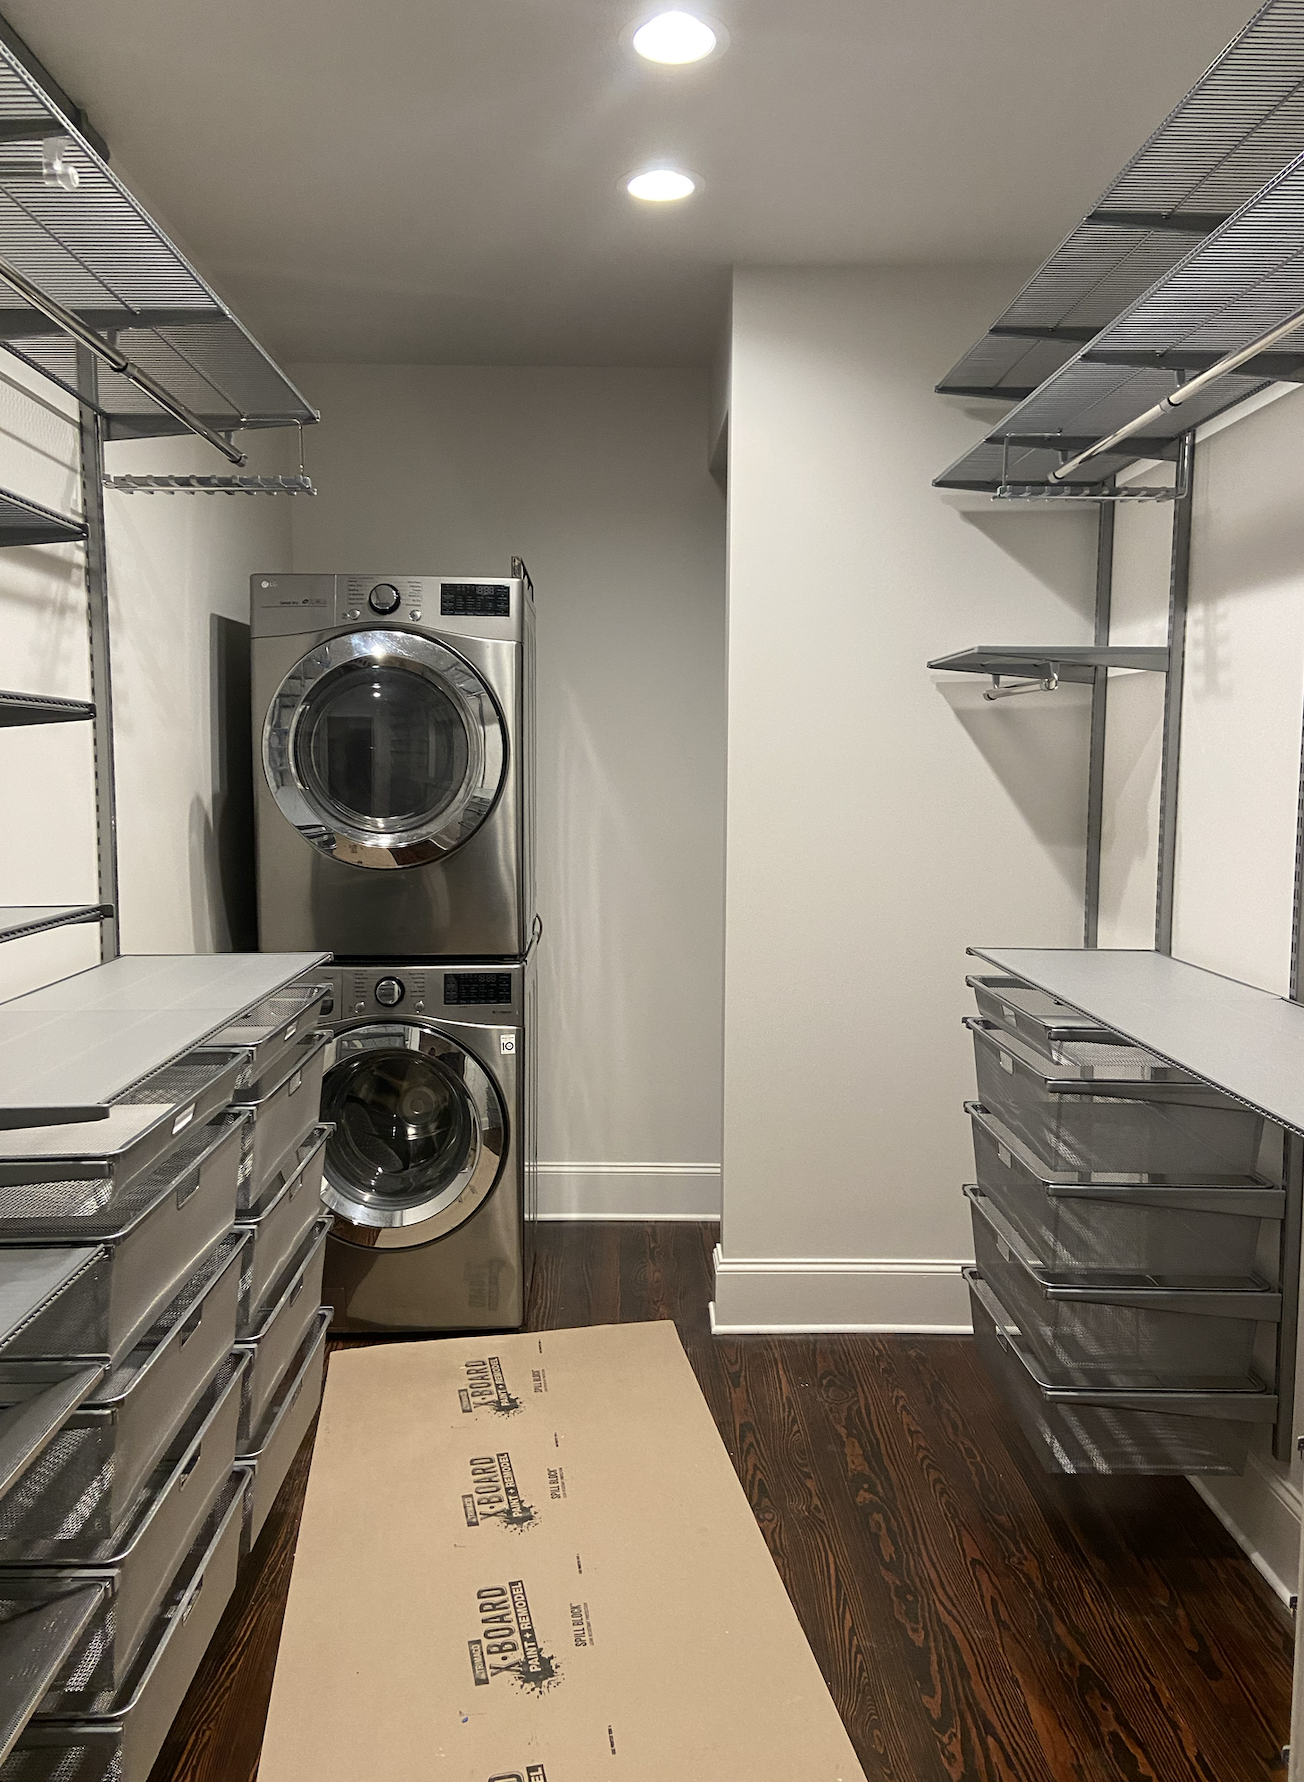
To improve functionality and future resale appeal, we relocated the washer and dryer to the closet and opted for a stackable unit to maximize space. This change not only enhanced the bathroom’s flow but also created a more private, streamlined laundry solution.

Planning, Budgeting & Construction: Setting the Stage for a Smooth Renovation
Once the final design plan is approved, I create a detailed project budget that accounts for every item we’ll be purchasing—from plumbing fixtures and tile to lighting, hardware, and bathroom accessories. With everything carefully selected, I begin the procurement process, ensuring that all materials are ordered before construction begins.
We don’t break ground until we have clear visibility into lead times, which helps prevent unnecessary delays. Starting construction without confirmed delivery dates can stall progress, so we prioritize efficient scheduling and proactive planning.
Next, I develop a construction timeline that outlines the full scope and duration of the project. In this case, because we’re working with an older Grant Park home, the timeline was extended to account for wall removal and reframing. I always build in buffer time to accommodate the natural ebb and flow of coordinating multiple trades. Even with a detailed plan, managing a renovation is a constant balancing act—juggling shifting schedules while keeping everything moving forward smoothly.

Take a look at this beautiful new framing, now enhanced by the higher ceilings we uncovered during demolition—it completely transforms the feel of the space, adding lightness and vertical volume.
During the process, we also discovered a ceiling drop in the back corner of the closet, but fortunately, it aligned perfectly with our plans to house the hot water heater in that area. It’s one of those rare renovation moments where things unexpectedly work in your favor—and in this case, it allowed us to maintain clean lines and maximize usable space.
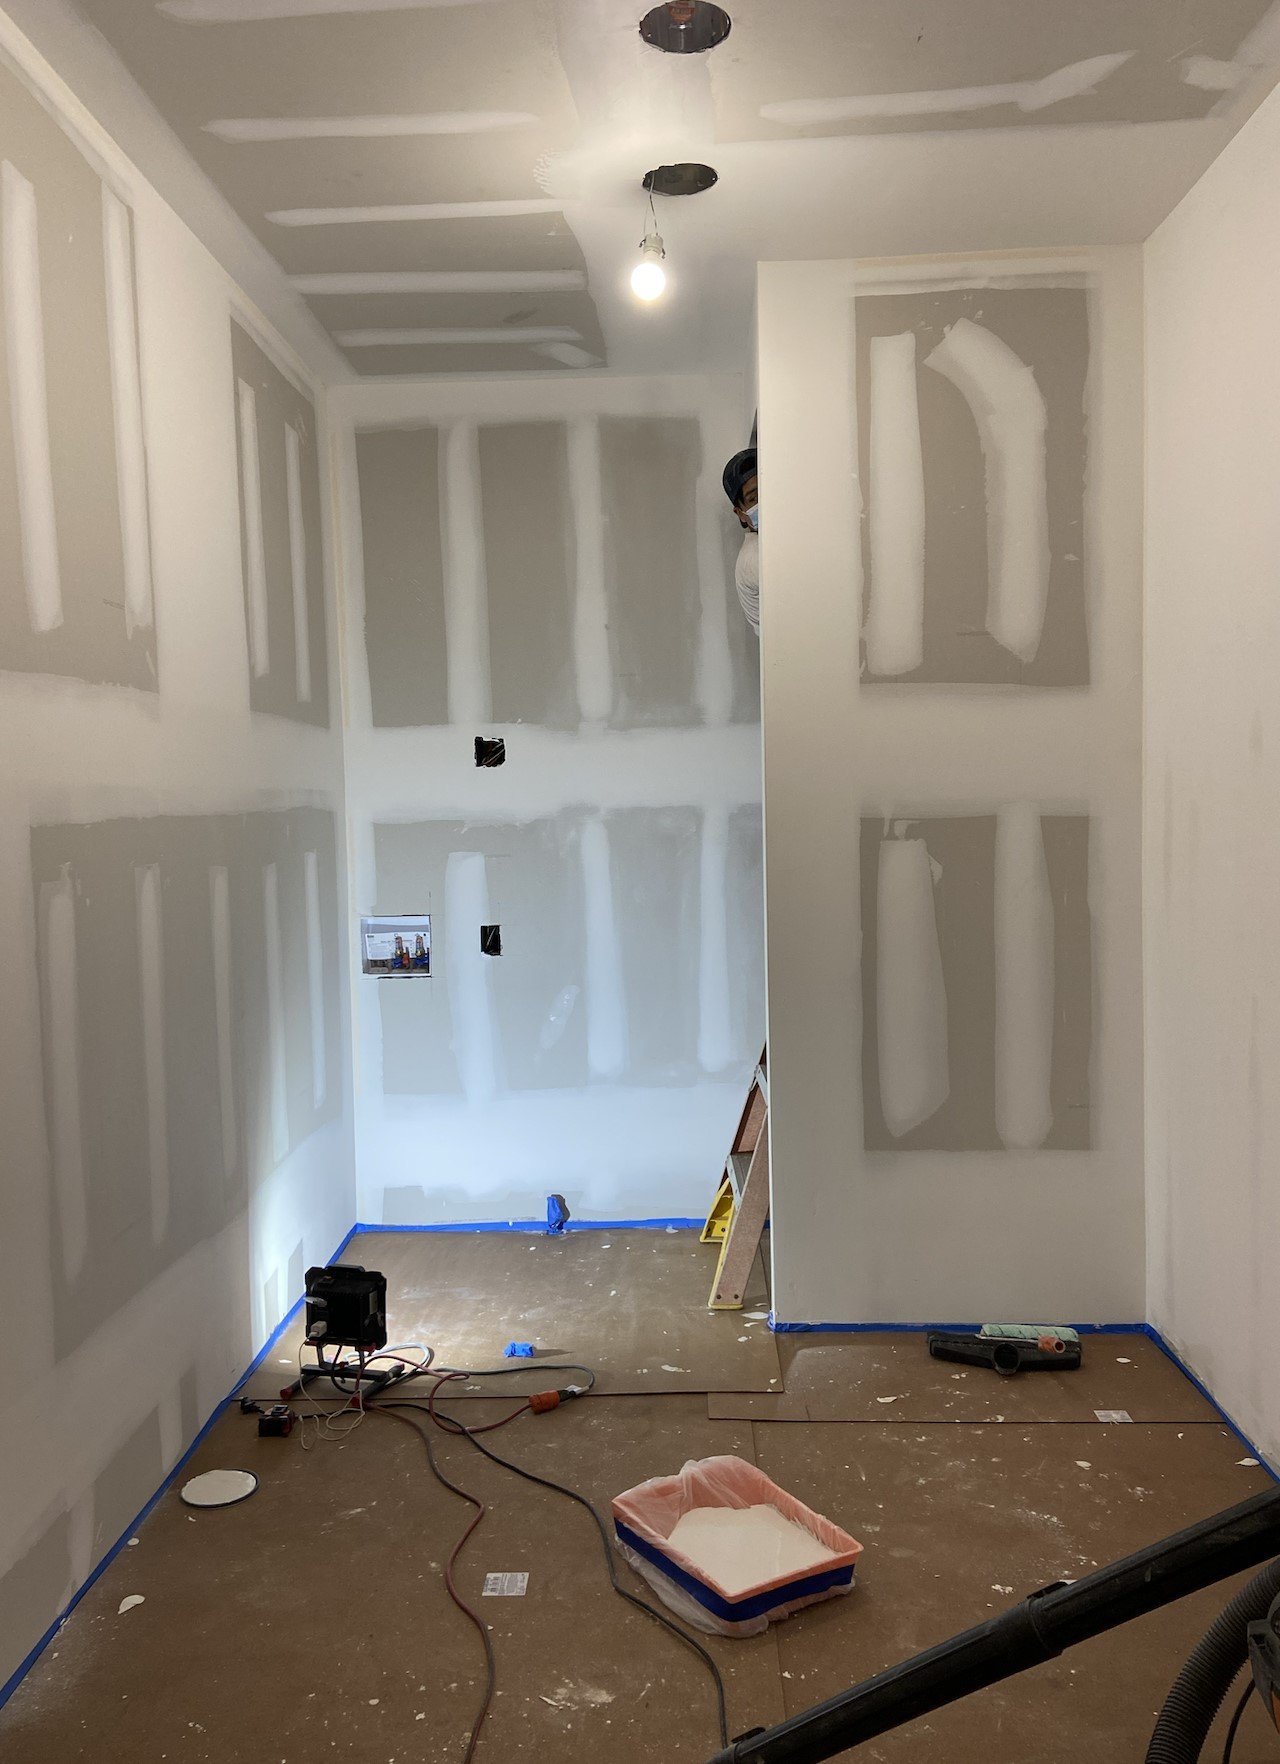
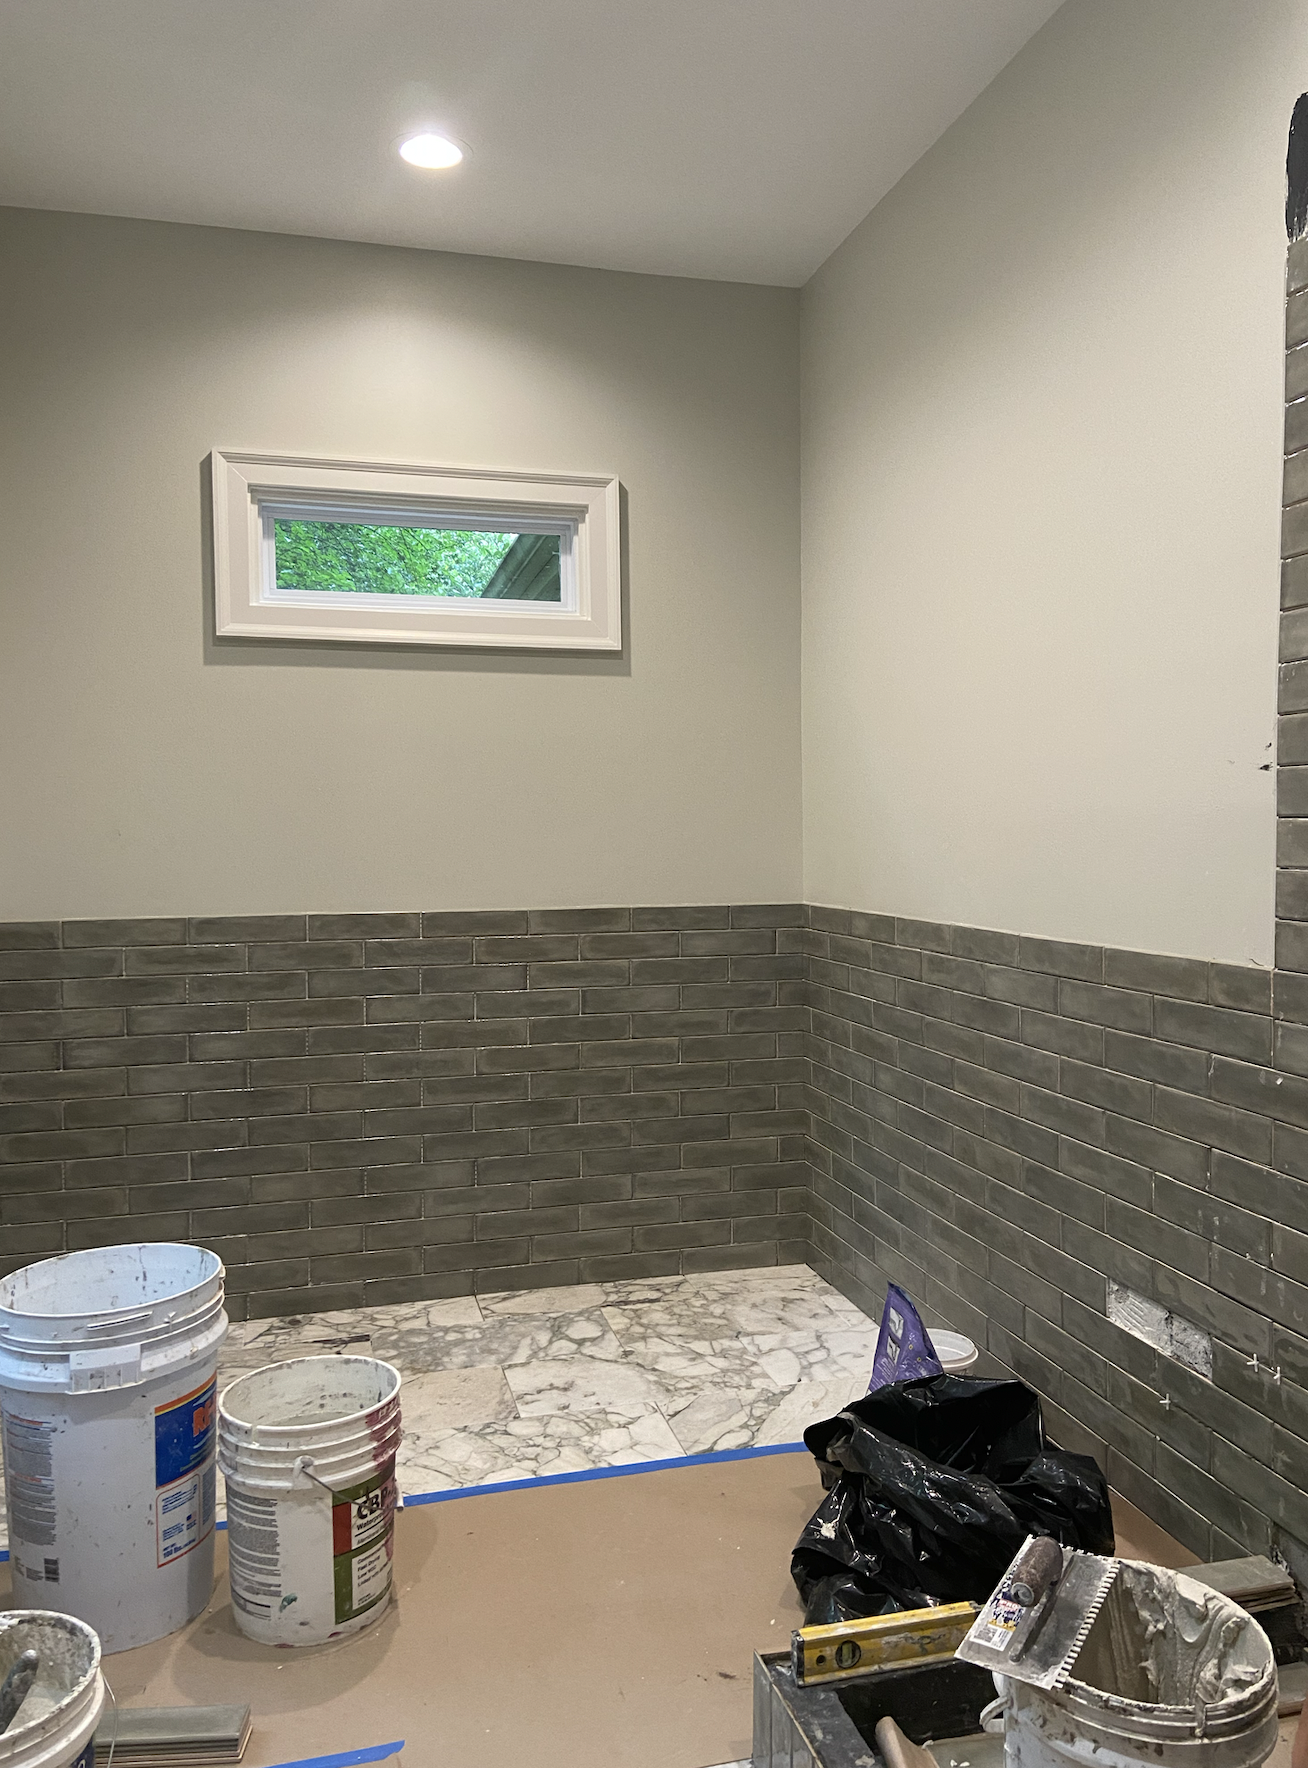
With sheetrock installed, we moved into the finishing phase—tiling, painting, and bringing in those final details that complete the space. We selected a natural stone tile for the floor, offering warmth and texture underfoot, paired with a glossy ceramic wall tile to reflect light and add a clean, elevated finish.
To introduce more natural light, we added a small casement window, perfectly placed to brighten the room without compromising privacy. The wall color, a soft gray-green, adds a calming, earthy tone that complements the tile and enhances the overall spa-like atmosphere.
Final Reveal: A Bright, Spacious Bathroom with Thoughtful Finishes
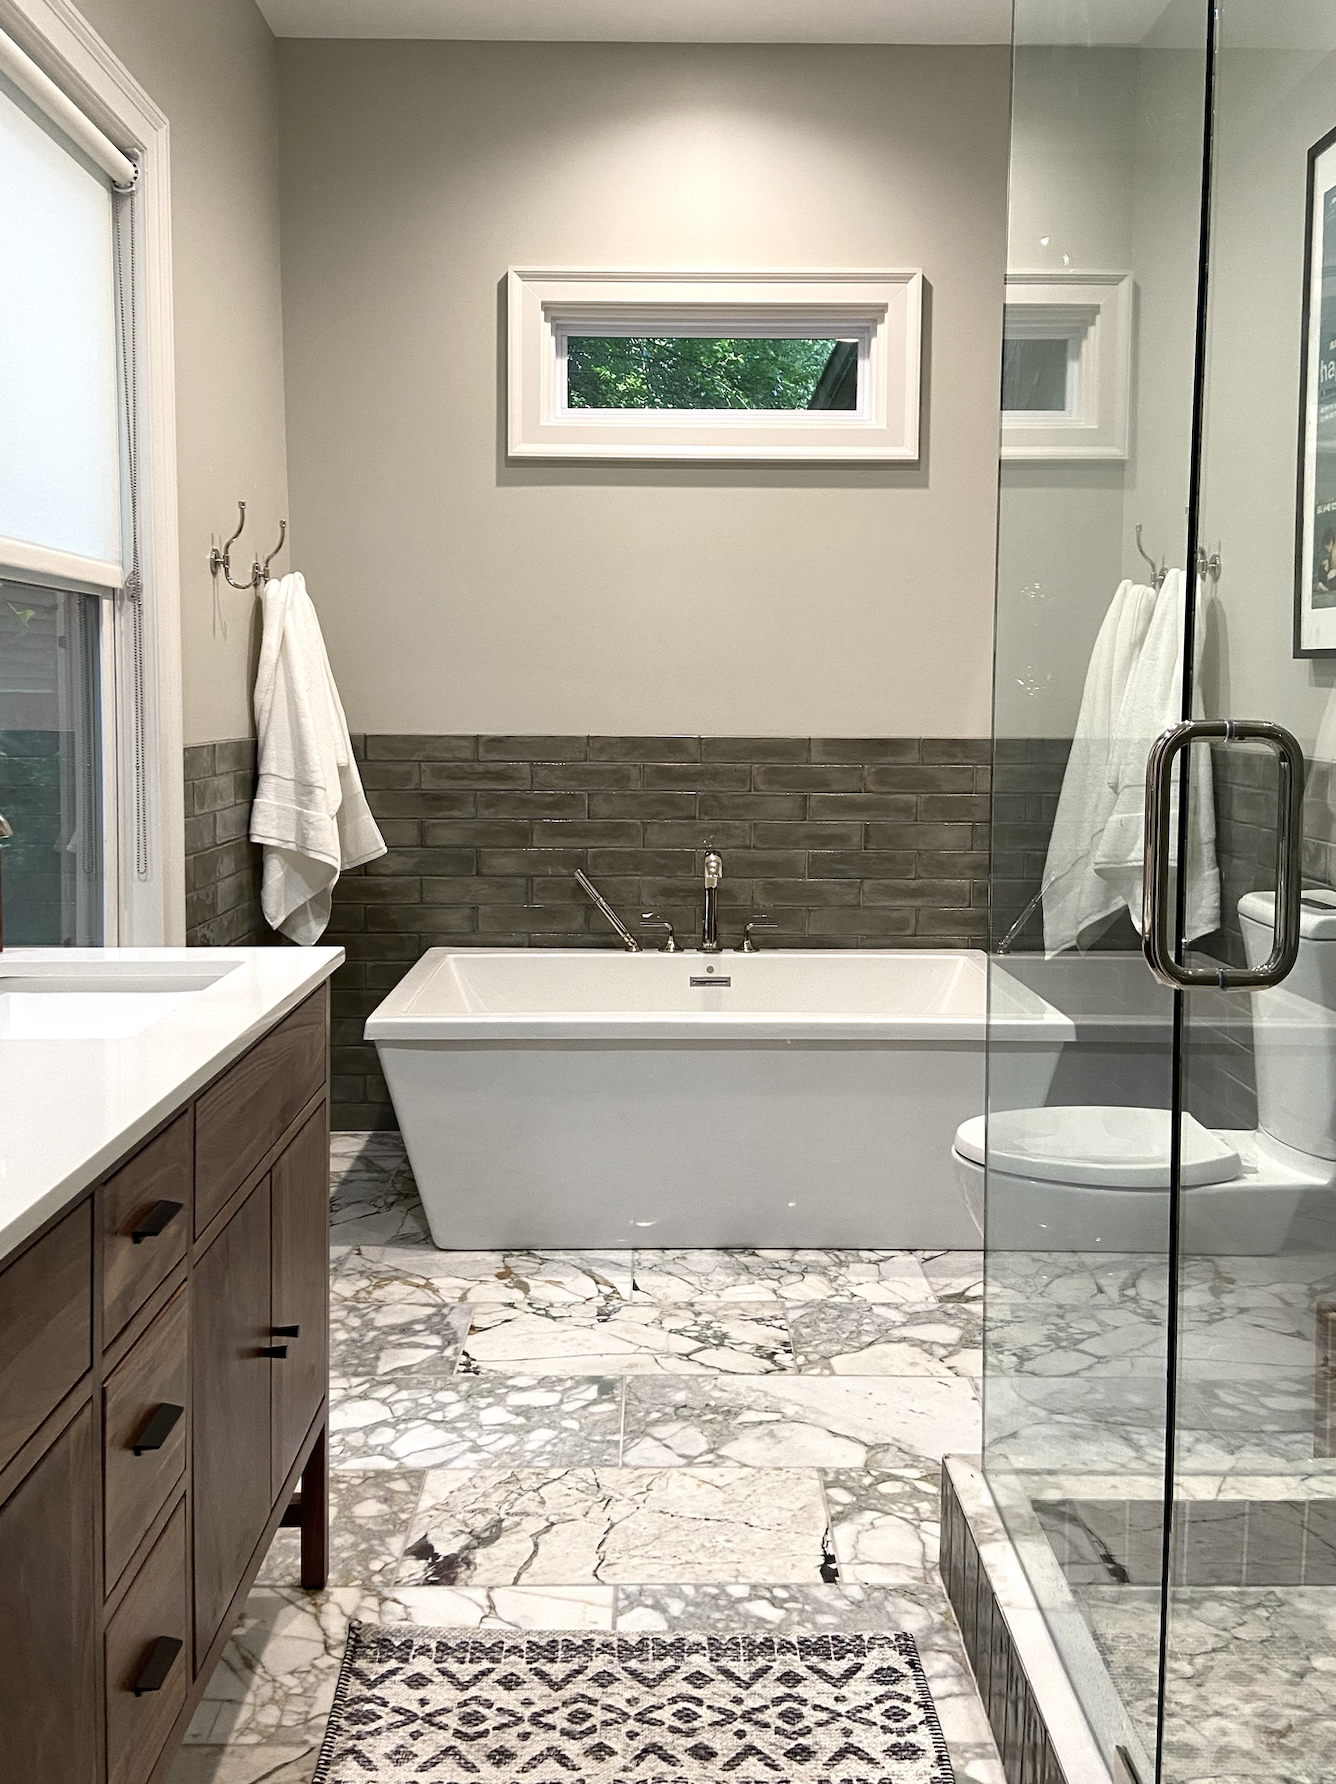
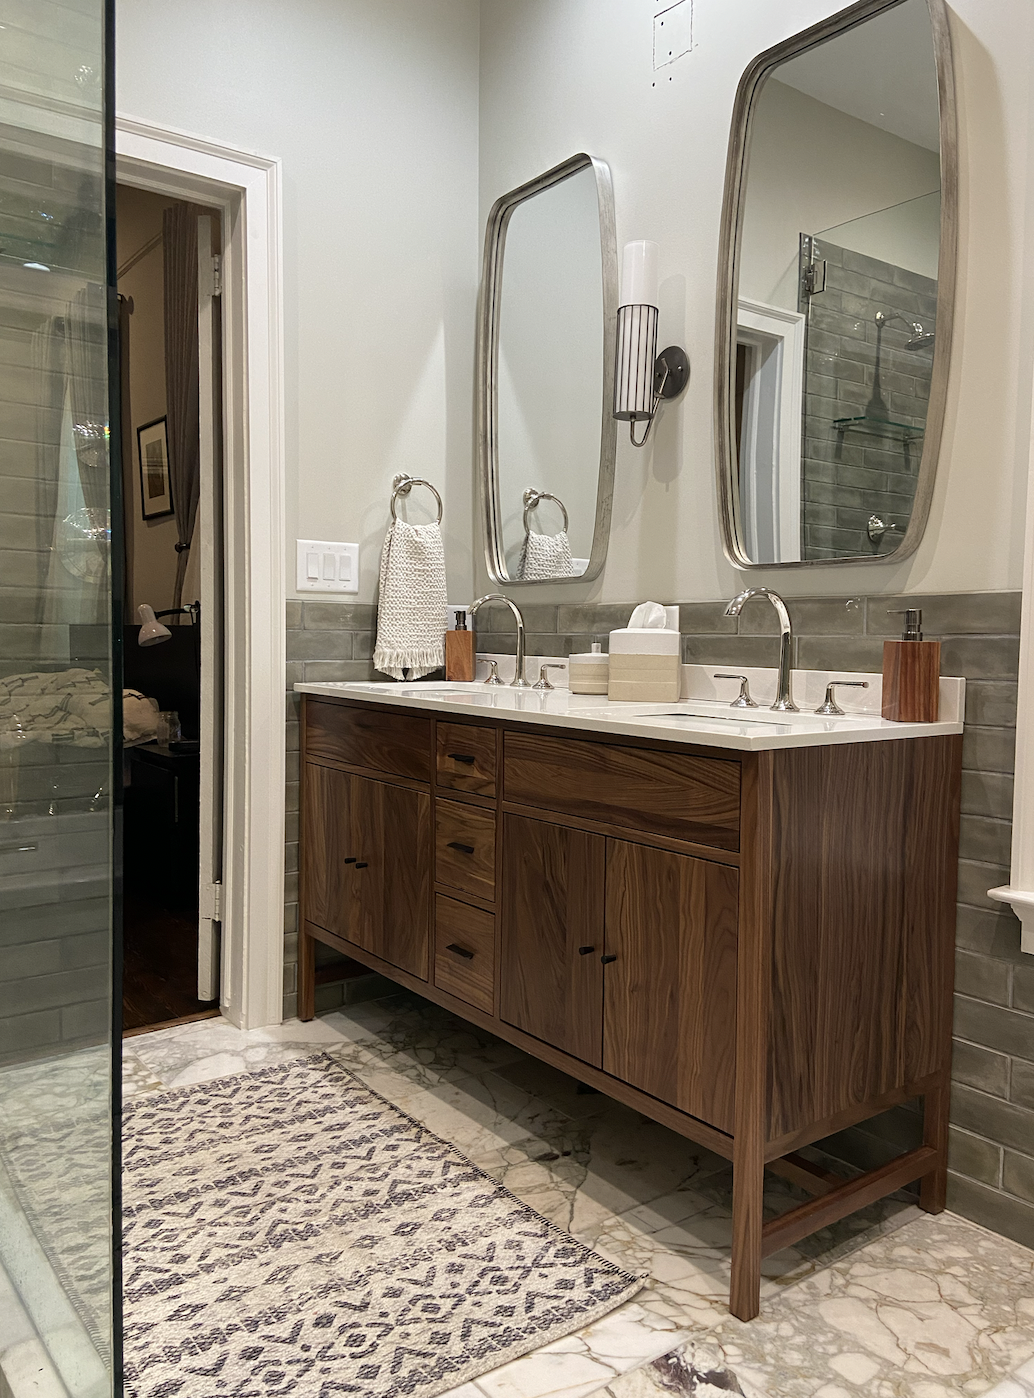
In the finished space, you can see how beautifully the freestanding soaking tub anchors the back wall beneath the new window—a stunning focal point that adds both elegance and functionality. The room now feels significantly larger, thanks to the higher ceilings and carefully considered space planning that maximizes both form and flow.
The client now enjoys a spa-like retreat complete with abundant natural light, ample closet space, towel hooks, a large walk-in glass shower, and of course, the luxurious tub he had hoped for.
We selected a semi-transparent roller shade for the window—perfect for bathrooms because it’s water-resistant, allows for filtered natural light, and maintains a clean, minimal look.
For the vanity, we chose a ready-made walnut piece from Room & Board, which aligned with our project timeline while still delivering a modern, high-quality finish that complements the overall design.
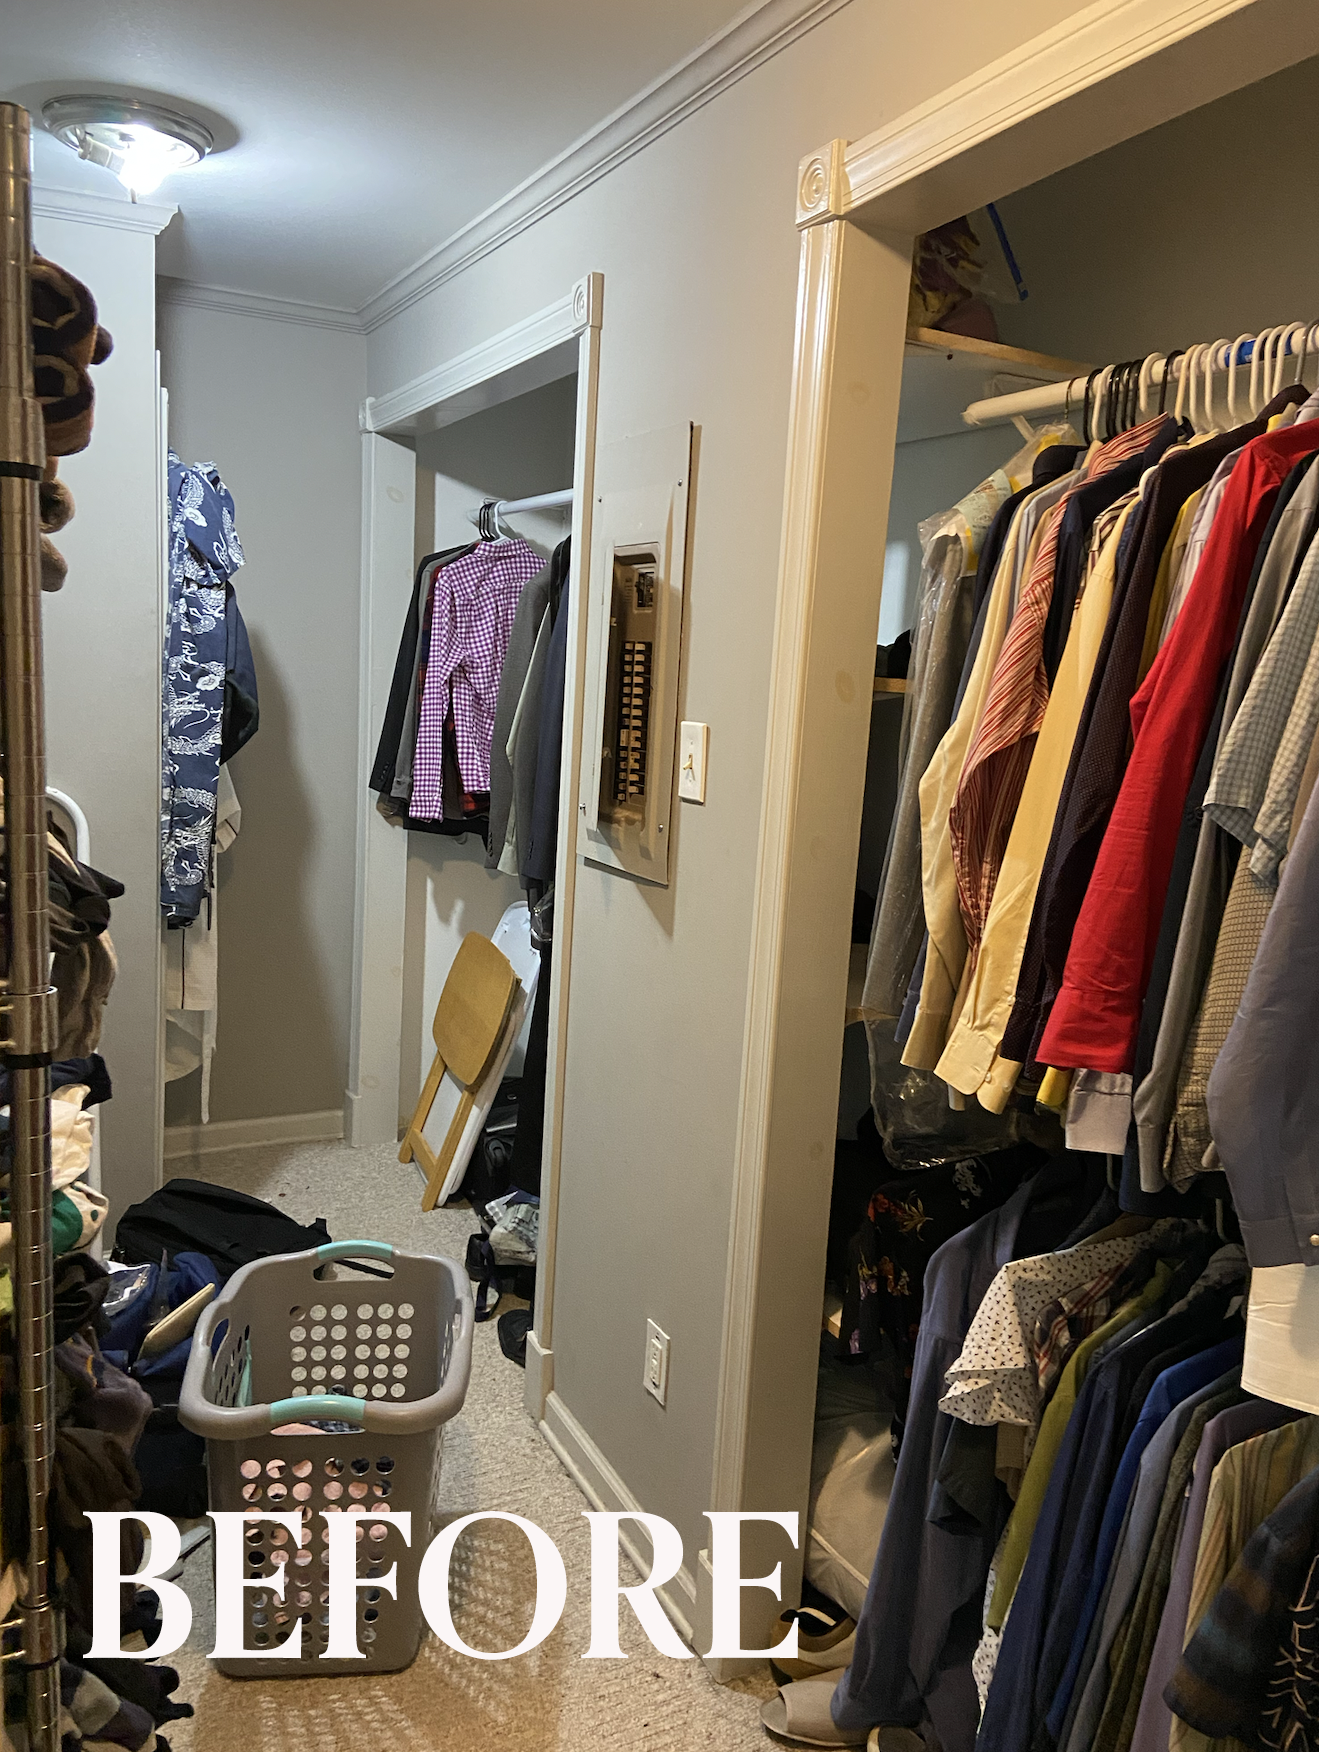
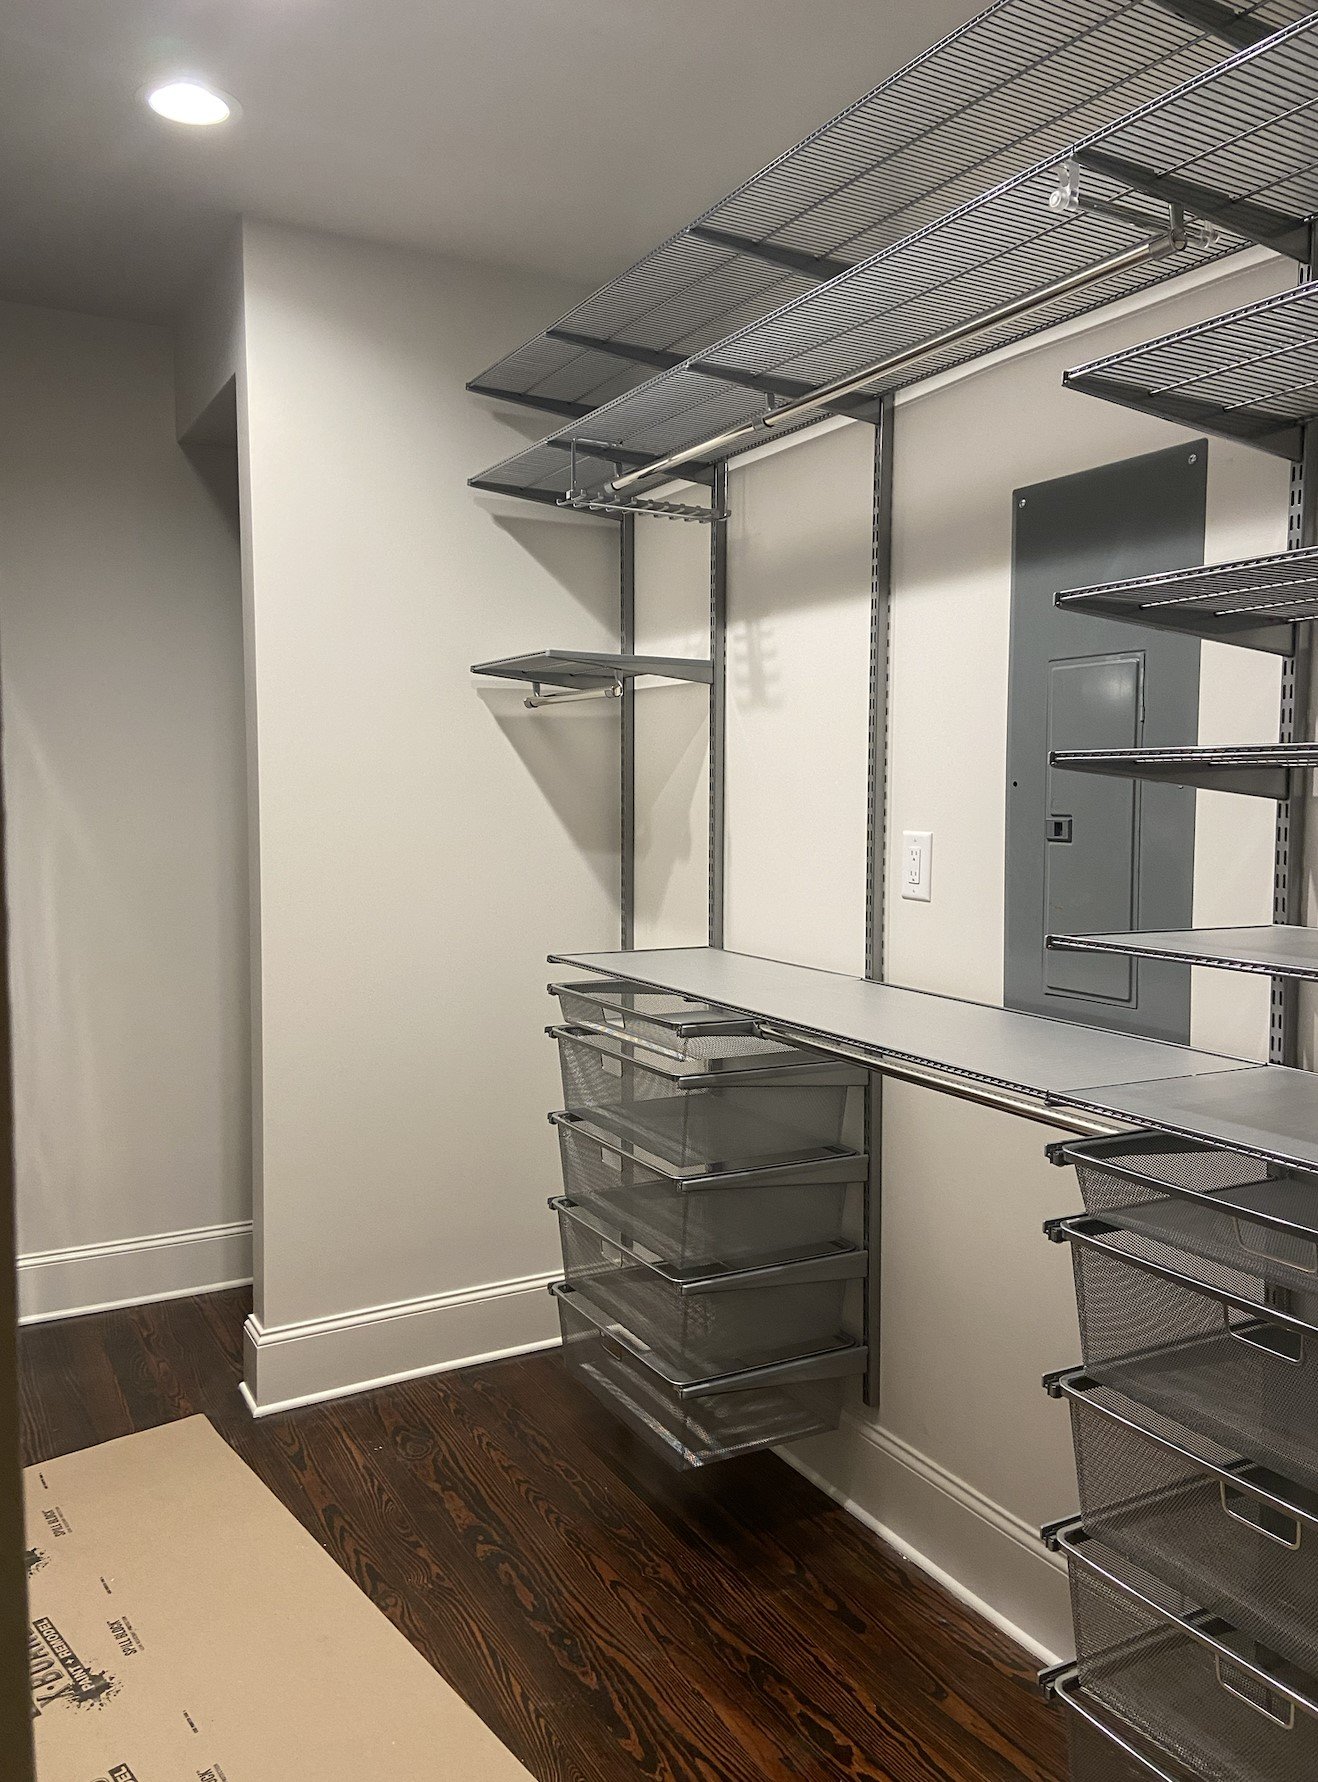
In the original closet layout, fixed dividers and awkward wall placement made it difficult to access clothing and fully utilize the space. To make matters worse, the client was relying on a kitchen storage rack for folded clothes—a temporary solution that quickly became impractical. Without proper shelves or drawers, anything not perfectly folded turned into a messy, overwhelming pile, making daily organization a challenge.
To begin the closet renovation, we removed the old carpet and installed matching wood flooring to create a cohesive flow with the adjacent bedroom. We added recessed lighting throughout to brighten the space and ensure everything is clearly visible—no more dark corners or lost clothing.
One of the biggest functional improvements was relocating the electrical panel to a side wall, which opened up the entire right side of the closet for storage. The new design includes a custom combination of drawers, open shelving, and hanging space tailored to the client’s wardrobe needs. We also incorporated belt and tie organizers for added functionality.
Importantly, we ensured the electrical box remains accessible, cleverly concealed behind cabinetry so it blends seamlessly into the design without compromising safety or convenience.
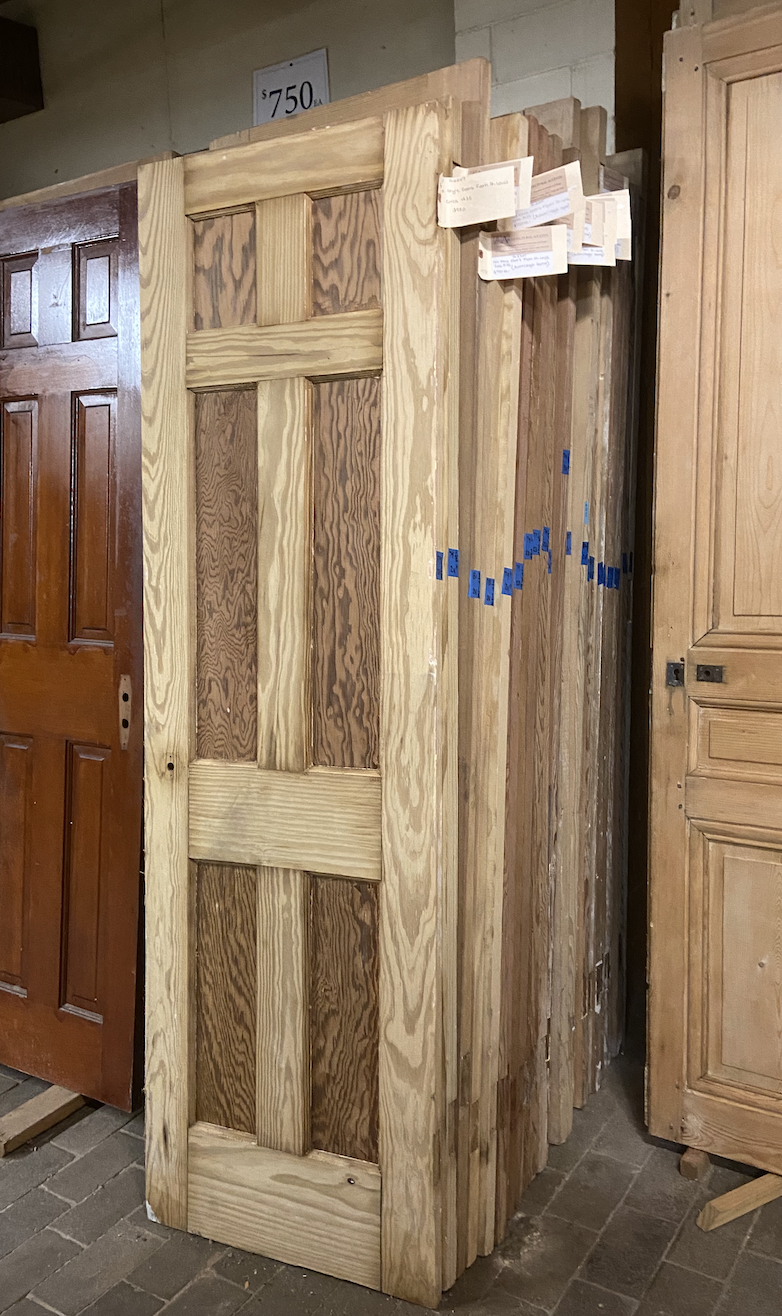
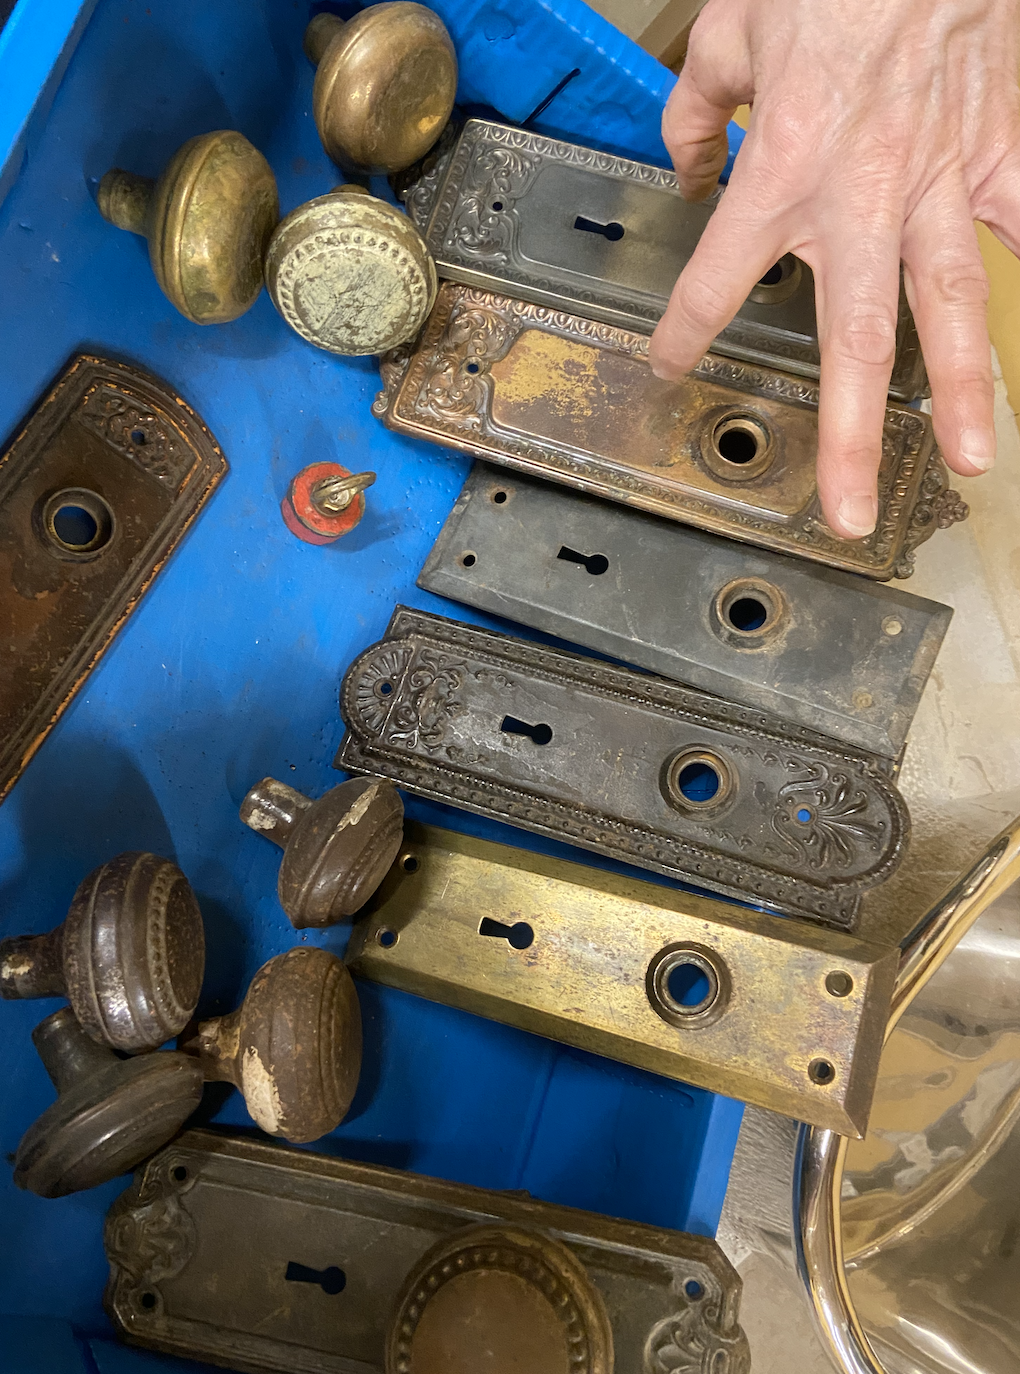
One special detail in this Grant Park renovation was sourcing a reclaimed heart pine door and vintage hardware from our favorite architectural salvage store. We carefully selected pieces that matched the original doors and hardware found throughout the rest of this historic home, preserving its architectural integrity and charm.
The existing bathroom door—a faux wood replacement—felt out of place and lacked character. Replacing it with an authentic, period-appropriate door brought back the home’s historic continuity, adding a layer of craftsmanship that ties the entire renovation together.
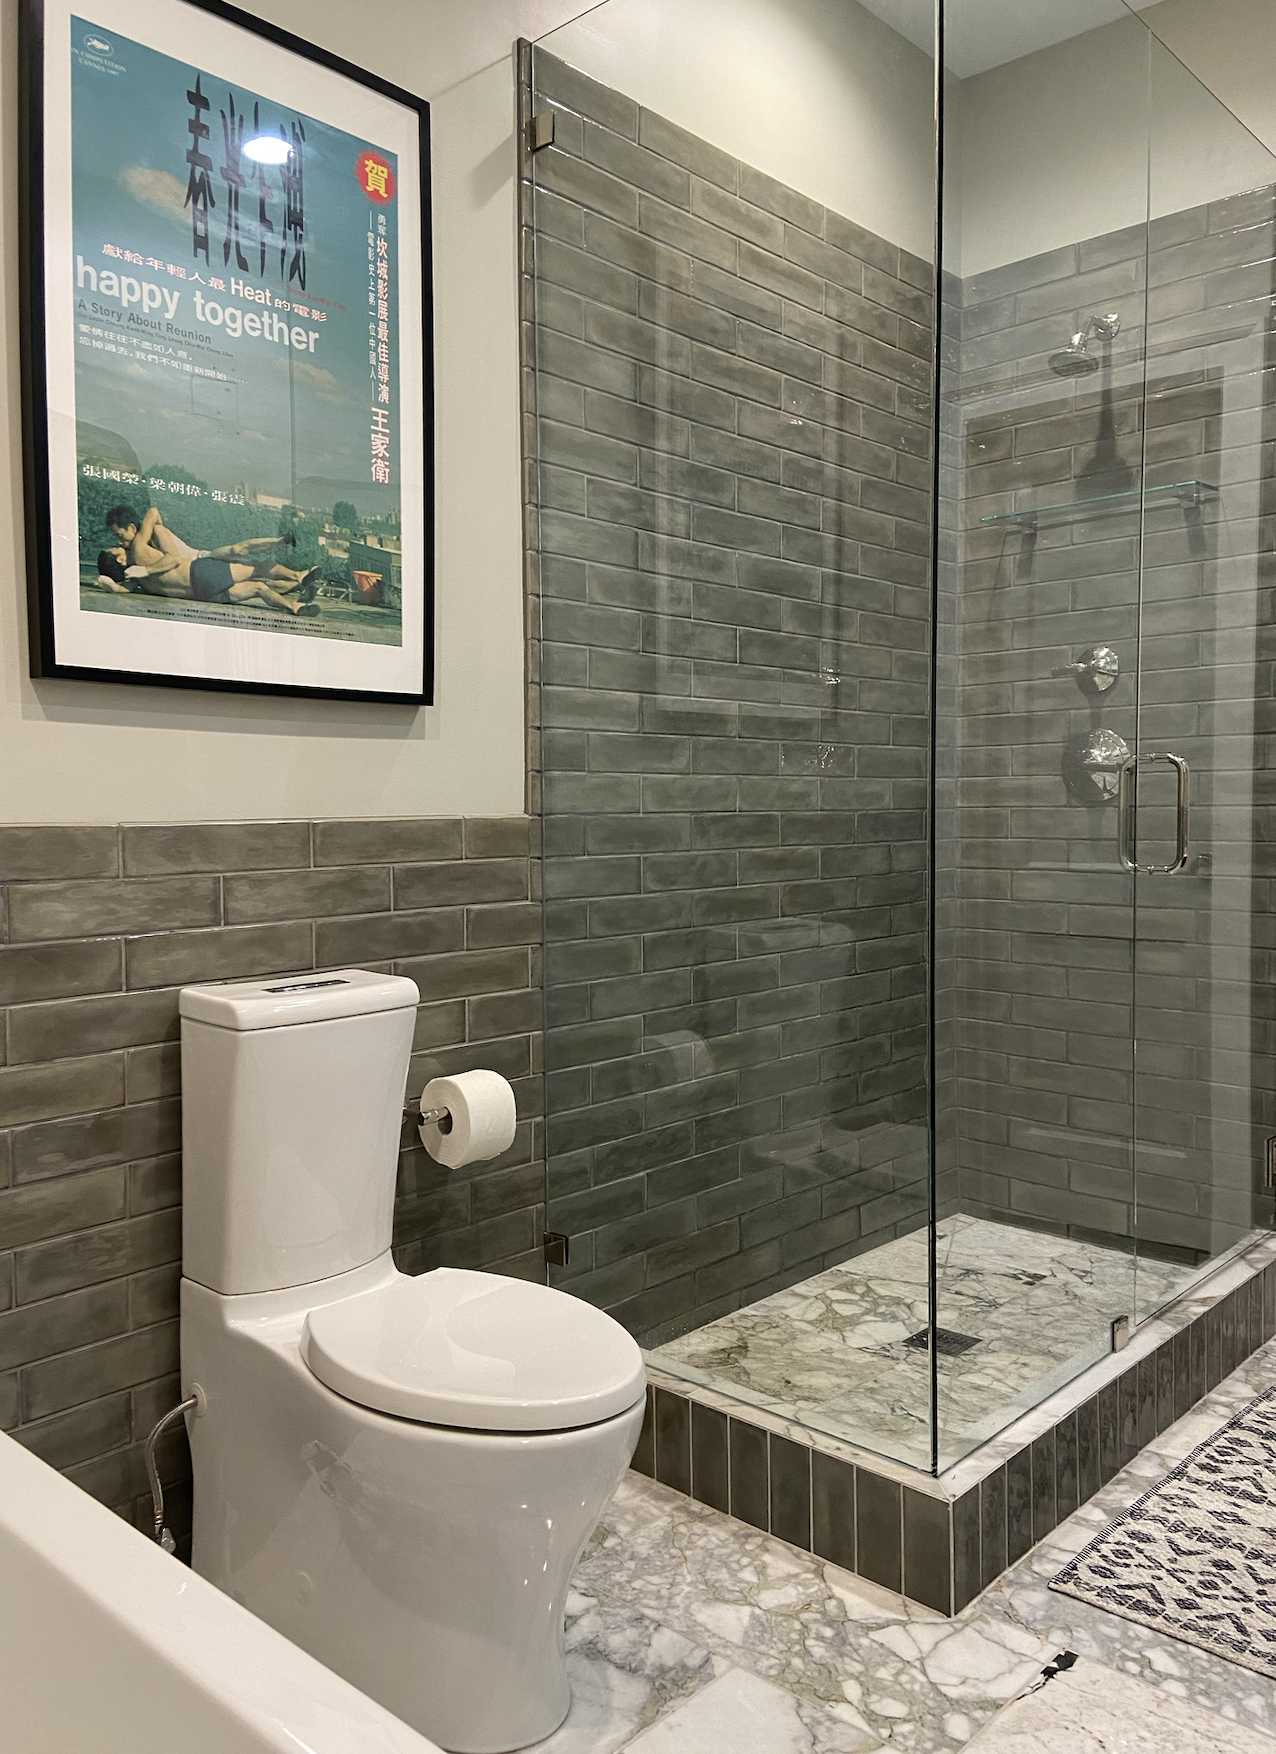
And here it is—the finished bathroom in all its fresh, refined glory. The client’s own artwork found the perfect home here, adding a personal touch and pulling the whole space together beautifully.
Although the iPhone photo plays a trick on the eye, the shower tile extends all the way to the ceiling, adding height and polish to the space. One of our favorite details is the soldier course tile pattern around the shower curb, which gives the design a tailored, custom finish.
Instead of a traditional niche, we opted for a sleek glass shelf—a minimalist and functional solution that keeps products organized without interrupting the clean lines of the tile work.
The result? A bathroom that feels fresh, modern, and effortlessly clean—the perfect blend of style and simplicity.

Like what you see? Interested in learning more about working with Violet Marsh Interiors on your Atlanta interior design project? Book a discovery call to see if we are a fit. Please cruise around the site using the navigation links below and please do let me know how I can help.